- This guide will walk you through the process of setting up an HMW server for Call of Duty: Modern Warfare Remastered (Multiplayer) HMW Mod. The guide includes all required files, installation steps, configuration steps, firewall steps, and instructions for installing IW4MAdmin to manage your server.
Important Note:
We do not provide the official Call of Duty: Modern Warfare Remastered game files. You must own and install the game separately before setting up the server. This guide assumes you have already installed the game on your machine.
Requirements:
- Copy of Call of Duty: Modern Warfare Remastered (Multiplayer): Ensure it's installed.
- HMW Launcher: Download the HMW launcher files.
- HMW Server Files.
- IW4MAdmin version 2024.8.16.1 (or newer).
- notepad++ (to make it easier to edit
server_default.cfg).
Install the HMW Mod:
- Unpack all the files inside the .zip archive into the directory of the game.
- Run HMW Launcher to install the mod.
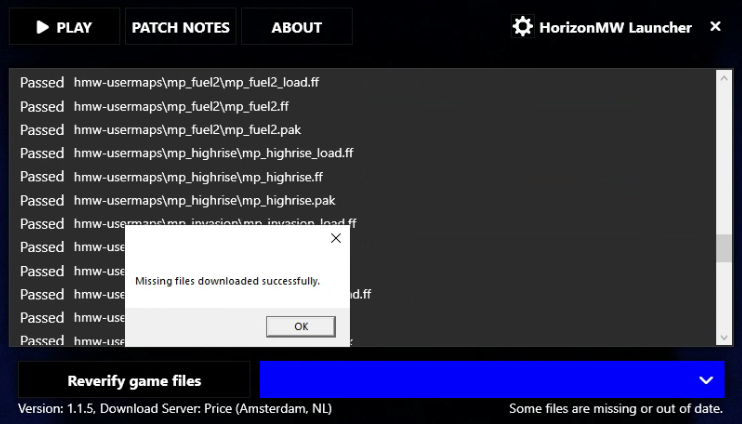
- Once the 'Verify game files' button appears, click on it to download the missing mod files.
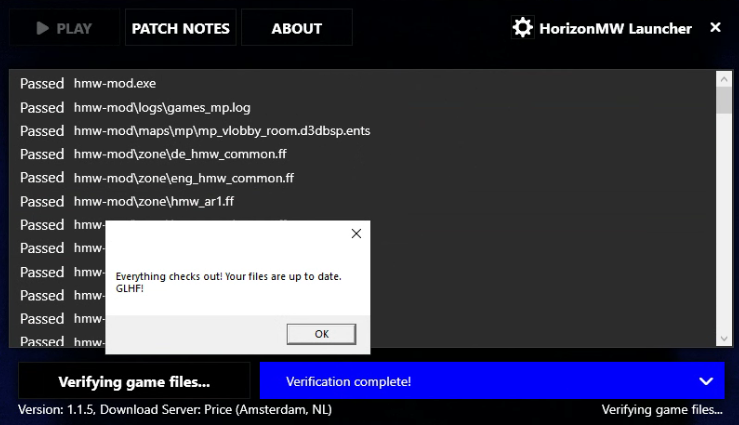
- When the files are finished downloading, click on the 'Reverify game files' button.
- If the files have finished verifying, and you have received the successful verification message, you can now close the Launcher (Launcher will only be used to keep the mod/server up to date).
Example
Install Server Hosting Files:
- After installing the HMW mod, ensure you have the necessary server hosting files (downloaded above).
- Place the
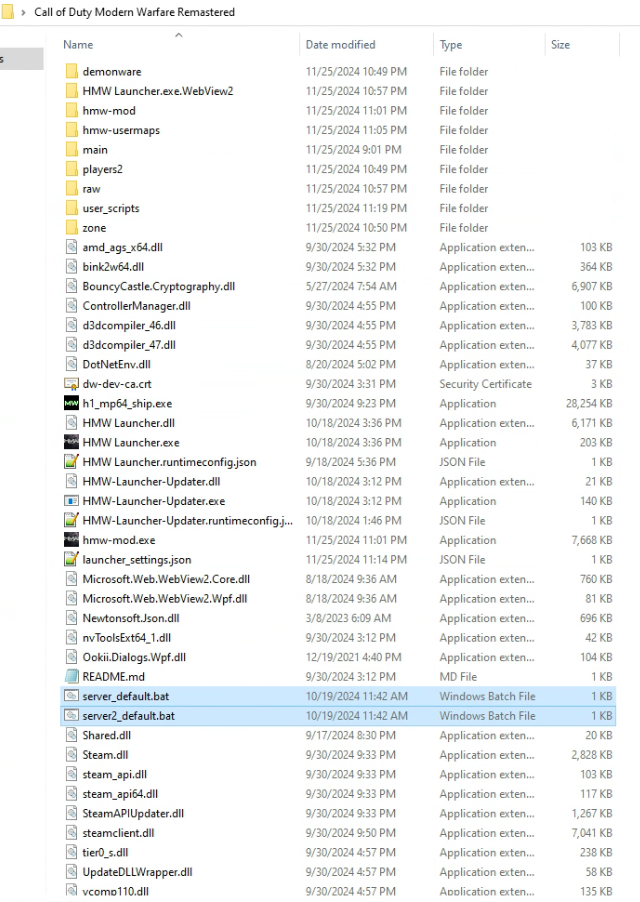
server_default.batfile into the root directory of the game installation. - Place the
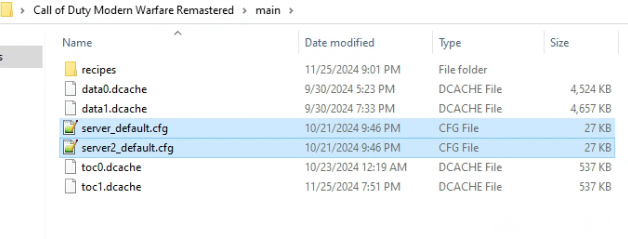
server_default.cfgfile into themainfolder. - Place the
auto_bots.cfgfile into theuser_scripts\mplocation (if you do not have a folder nameduser_scripts, make one, then another folder inside it namedmp).
Single Server:
- You will need one
server_default.batfile and oneserver_default.cfgfile to configure your single server instance. - If you do not plan on hosting more than one server skip the below steps on how to have multiple servers.
Example on where the server_default.bat should be:
Example on where the server_default.cfg should be:
Example on where the auto_bots.cfg should be:

Multiple Servers:
-
For multiple servers, create a separate
server_default.batfile andserver_default.cfgfile for each server. Rename them for easy identification, e.g.:server1_default.batandserver1_default.cfg– Main server.server2_default.batandserver2_default.cfg– Dedicated server for a specific game mode (i.e. Capture the Flag).server3_default.batandserver3_default.cfg– For community events or special game nights.
-
In each
server_default.batfile:- Edit it to point to the corresponding
server_default.cfgfile for that server. - Modify the port used for each
server_default.batfile to ensure they use different ports.
- Edit it to point to the corresponding
Example server1_default.bat content:
@echo off
::Name of the server shown in the title of the cmd window. This will NOT bet shown ingame.
set name=HMW Dedicated - Default
::Name of the config file the server should use. (default: server.cfg)
set cfg=server1_default.cfg
::Port used by the server (default: 27016)
set port=27016
::Only change this when you don't want to keep the bat files in the game folder. MOST WON'T NEED TO EDIT THIS!
set gamepath=%cd%


title HMW - %name% - Server restarter
echo Server "%name%" will load %cfg% and listen on port %port% UDP!
echo To shut down the server close this window first!
echo (%date%)  -  (%time%) %name% server start.

:server
start /wait /abovenormal hmw-mod.exe "%gamepath%" -dedicated -memoryfix +exec "%cfg%" +set net_port %port% +map_rotate
echo (%date%)  -  (%time%) WARNING: %name% server closed or dropped... server restarts.
goto server
Example server2_default.bat content:
@echo off
::Name of the server shown in the title of the cmd window. This will NOT bet shown ingame.
set name=HMW Dedicated - Default
::Name of the config file the server should use. (default: server.cfg)
set cfg=server2_default.cfg
::Port used by the server (default: 27016)
set port=27017
::Only change this when you don't want to keep the bat files in the game folder. MOST WON'T NEED TO EDIT THIS!
set gamepath=%cd%


title HMW - %name% - Server restarter
echo Server "%name%" will load %cfg% and listen on port %port% UDP!
echo To shut down the server close this window first!
echo (%date%)  -  (%time%) %name% server start.

:server
start /wait /abovenormal hmw-mod.exe "%gamepath%" -dedicated -memoryfix +exec "%cfg%" +set net_port %port% +map_rotate
echo (%date%)  -  (%time%) WARNING: %name% server closed or dropped... server restarts.
goto server
Set Up Firewall Rules:
Open Windows Defender Firewall:
- Go to Control Panel > System and Security > Windows Defender Firewall.
- Click on 🛡️ Advanced settings (left hand side).
Create Inbound Rules:
TCP Rule:
- Click on Inbound Rules > New Rule.
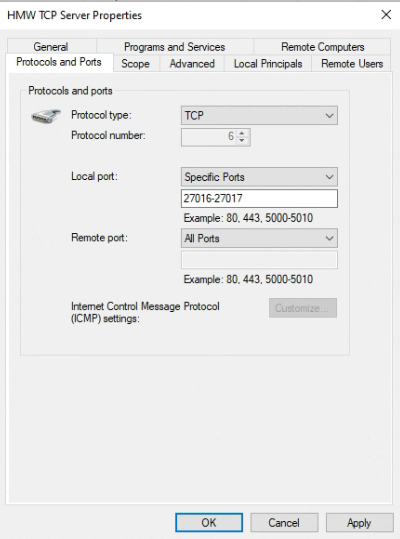
- Select Port, then choose TCP and specify the port range
27016-27017. - Allow the connection and name the rule (e.g. "HMW TCP Server").
UDP Rule:
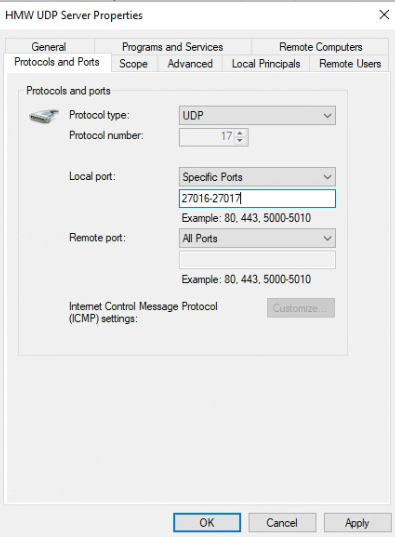
- Repeat the process for UDP, specifying the same port range
27016-27017. - Allow the connection and name the rule (e.g. "HMW UDP Server").
Example on how firewall rules should look like:
For Multiple Servers:
- If you want to host more than one server, expand the port range to how many servers you plan on hosting, for example
27016-27030. - This gives you a total of 15 separate ports (from
27016to27030, inclusive), allowing you to host multiple instances of the server simultaneously.
Configuring server_default.cfg:
- To edit this .cfg more easily, it is advised to install notepad++, however you can use the standard Notepad that comes with Windows.
- The right hand side text within the .cfg will explain what each setting does, the guide will still show the basic changes needed to have a fully working server.
- Anything commented out (with a
//) will be disabled, so make sure that, when changing settings like gametype and map rotation, to only have one set at a time. - If you have more than one set sv_maprotation at a time it will not load the gametype or map you chose, and will default to War instead.
- Open the .cfg in notepad++ or the standard Notepad that comes with Windows.
- Change the name of the server to what you want; it's set to
^2Default ^7Serverwhen you first open the .cfg. - Under BASIC CONFIGURATION, you can set a password for the server so only people who know the password can join. If you want anyone to be able join, leave this field blank.


- At the bottom of this .cfg you will find the setting for changing gametype and maps that players will be able to vote on.
IW4ADMIN Settings
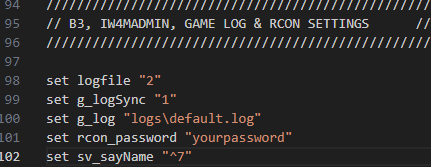
- IW4ADMIN will need an
rcon_password(this is not the same as a server password).
- Find
set rcon_passwordand within the quotation marks (" ") set a password to use with IW4ADMIN, i.e."testserver"(each server you set up will need this to be set up if you are using IW4ADMIN). - Find
set g_log, which will show"logs\default.log". You can use the server name for this so its easier to know which log is for which server, i.e."logs\yourservername.log".
Start the Server:
- Double-click the desired
server_default.batfile in the game directory to launch the server.
Set Up IW4MAdmin:
- IW4MAdmin is an admin management tool designed to help server administrators manage their server more efficiently. This tool allows you to monitor server status, ban players, manage server settings, and more, all through a web interface, or in-game commands.
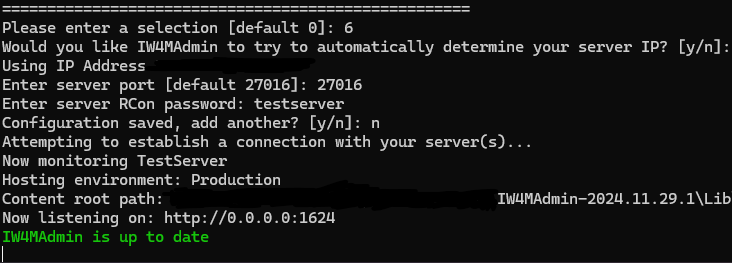
- When you first start IW4MAdmin you will be asked some Yes/No questions for features you can have on your server. You can choose whatever you want here, this does not need to be the same as below.
- Make sure to answer 'No' for 'Enable multiple owners?' if you only want yourself to have owner rights. If you want a friend to have permissions as well, answer 'Yes', but it recommended to have this turned off.

-
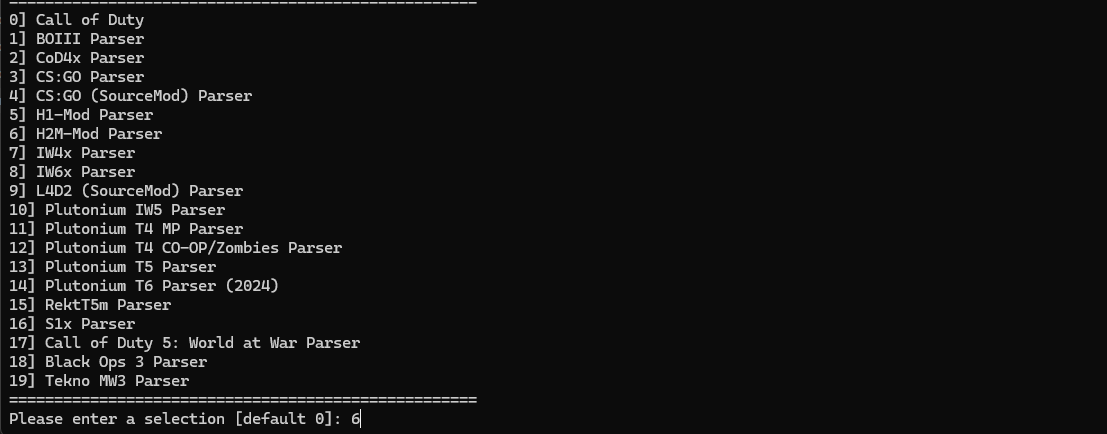
The next step is to choose the client you will be using with IW4MAdmin. You will need to choose
6]for H2M, as HMW uses the original H2M-Mod to function.
-
Once you have chosen
H2M-Mod Parser(the sixth option) IW4MAdmin will now ask if you would like it to automatically determine your server IP; choose 'No', because it will not determine the IP correctly.
- Once you have selected 'No', you can input your IP address.
- It will then ask for the port that your server will be using; the first one will be the default
27016port. - It will then ask for the RCon password, you will need to put whatever you set this as in the .cfg file.
-
If you are only hosting one server you can input 'No' and continue with the rest of the set up for IW4MAdmin.
-
If you are hosting more than one server you will need to input 'Yes' and follow the steps above to set up the servers you have. Make sure the port is a number higher for each server you'll host, i.e.
27017,27018, and so on. -
Once you have finished setting up the IP and ports, it will try to connect to the servers. Make sure you have them running before continuing.

-
You should now see IW4MAdmin has successfully established a connection with your HMW server.
-
You will now need to join the server, see below example for the connect command.
connect <Your-IP-Address>:<Port>
-
Example:
connect 1.1.1.1:27016 -
If your server is password-protected, see following example:
connect 1.1.1.1:27016; password <your-password>
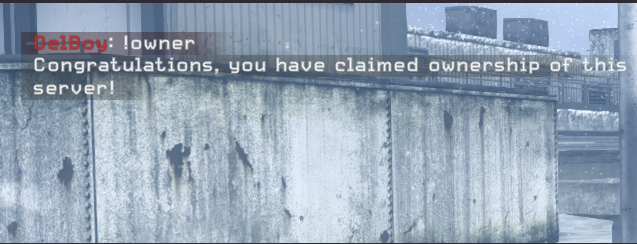
- Once you have joined the server, open the in-game chat, and type
!ownerinto it; this will give you ownership of the server.
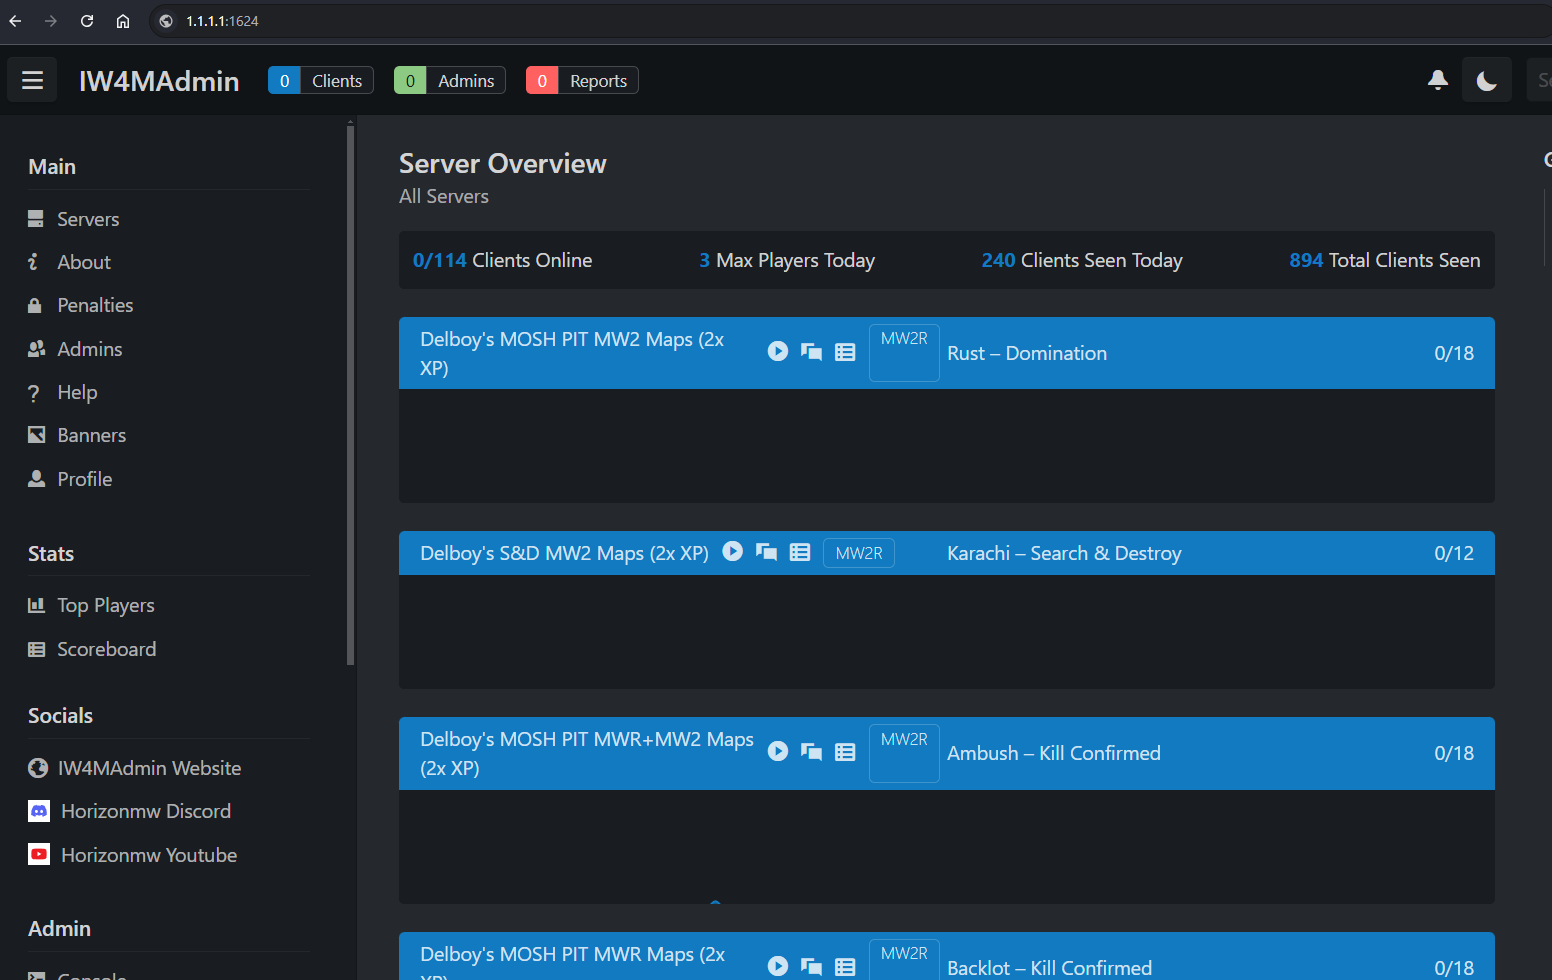
- If you want to control the server using the webfront you can open a browser window and input the IP of your server with
:1624at the end, then hit Enter; see example below.
- You will be taken to a webpage similar to this one, but will only see your own servers.
- To be able to control your server from this webfront, you will need to log in. To do this you will need to have two things: your client tag, and the token.
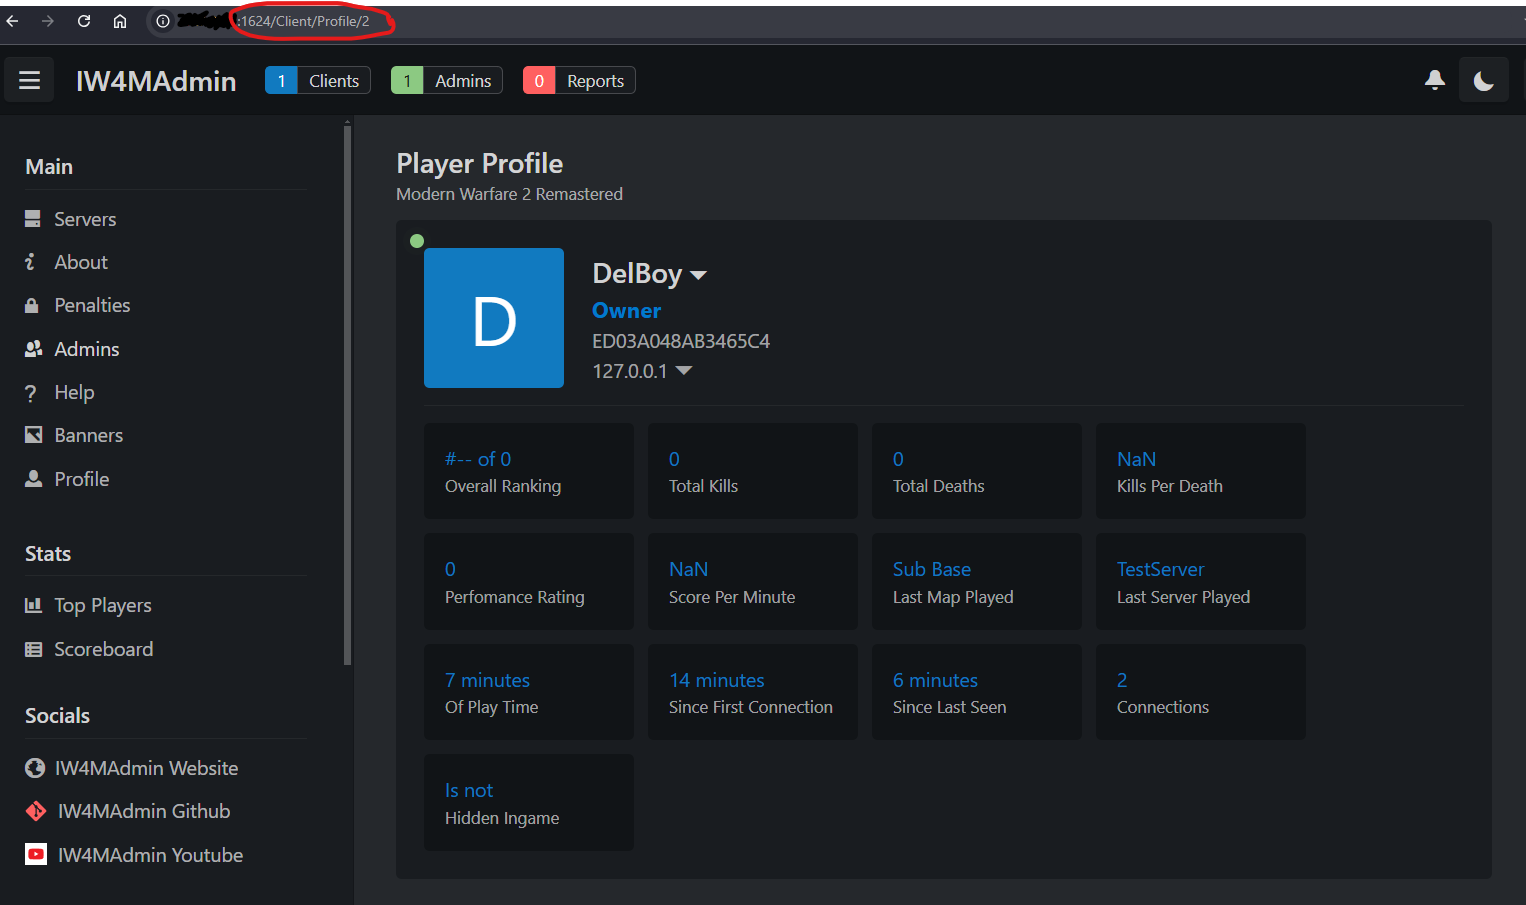
- Client ID: Whilst in the server, head over to the webfront. You will only see yourself on the server. Click on your name, and it will bring up your profile; in the search bar you will see a URL like :1624/Client/Profile/. At the end of this URL you will see your Client ID, i.e. :1624/Client/Profile/55.
- Keep note of this number and move on to the next step.

-
Token: Whilst in the server, use the command
!rtin chat, and keep note of the token it gives you.

-
Back on the webfront, click Log In (on the left hand side), and input the Client ID and Token you received. The token has a time limit, so if you don't do this fast enough you will have to get a new token from the server.
Regular Maintenance:
- Keep the HMW launcher Updated.
- Keep the VPS updated for optimal performance.
Requesting Server Key:
⚠ Server hosting keys are not available at this moment ⚠
- To list your server on the official HMW server browser, apply for the Server Host role on the Discord server, then request a server key from the HMW staff.
- Each server requires its own unique key. Once received, add it to the corresponding
server_default.cfgfile.
-
While listing on the official browser is optional, it provides greater visibility for you and your community.
-
If the server is not listed, share the
connectcommand with your players:connect <Your-IP-Address>:<Port> -
Example:
connect 1.1.1.1:27016 -
If your server is password-protected, see following example:
connect 1.1.1.1:27016; password <your-password>
Setting Up RestartOnCrash (Coming Soon)
- Instructions on setting up the RestartOnCrash program will be added soon. This will ensure your server restarts automatically in case of a crash.